ラジオボタン(RadioButton)を作成する方法を知りたい
という方に向けた記事になります。
複数ある選択肢の中から、1つの項目を選択させたい。そんな場合に、ラジオボタン(RadioButton)を使用します。
本記事では、「Android Studio でラジオボタンを作成する方法」について解説します。
ラジオボタン(RadioButton)とは
ラジオボタンとは、複数ある選択肢のうち一つを選択する場合に使用するボタンになります。Android Studio では、RadioGroupを一つの選択肢のセットとして、RadioButtonを複数設定します。
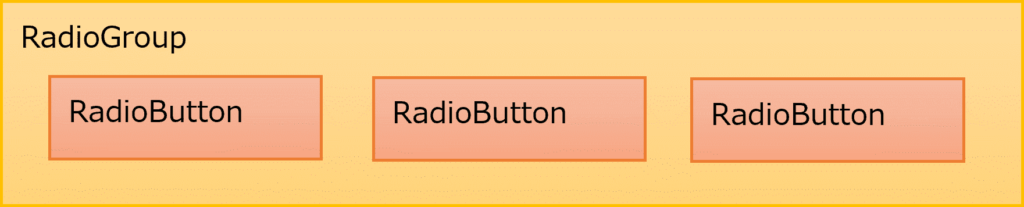
ラジオボタンはLinearLayoutと同様に、属性「android:orientation」で選択肢を縦方向に並べるか横方向に並べるかを指定できます。指定なしだと自動的に縦並びになりますが、警告が出るので指定してあげましょう。
ラジオボタン(RadioButton)の使い方
まずは単純にアプリ画面にラジオボタンを作成していきましょう。
選択肢のセット(枠)となるRadioGroupを記述し、その間にRadioButtonを追加していきます。
●activity_main.xml
<?xml version="1.0" encoding="utf-8"?>
<LinearLayout xmlns:android="http://schemas.android.com/apk/res/android"
android:layout_width="match_parent"
android:layout_height="match_parent"
android:orientation="vertical" >
android:id="@+id/rbGroup"
android:layout_width="wrap_content"
android:layout_height="wrap_content"
android:orientation="horizontal" >
android:id="@+id/rbButton1"
android:layout_width="wrap_content"
android:layout_height="wrap_content"
android:text="@string/rb_button1"/>
android:id="@+id/rbButton2"
android:layout_width="wrap_content"
android:layout_height="wrap_content"
android:text="@string/rb_button2"/>
<?xml version="1.0" encoding="utf-8"?>
<LinearLayout xmlns:android="http://schemas.android.com/apk/res/android"
android:layout_width="match_parent"
android:layout_height="match_parent"
android:orientation="vertical" >
<RadioGroup
android:id="@+id/rbGroup"
android:layout_width="wrap_content"
android:layout_height="wrap_content"
android:orientation="horizontal" >
<RadioButton
android:id="@+id/rbButton1"
android:layout_width="wrap_content"
android:layout_height="wrap_content"
android:text="@string/rb_button1"/>
<RadioButton
android:id="@+id/rbButton2"
android:layout_width="wrap_content"
android:layout_height="wrap_content"
android:text="@string/rb_button2"/>
</RadioGroup>
</LinearLayout>
●strings.xml
<string name="app_name">hyomolutionRadioButtonSample</string>
<string name="rb_button1">ボタン1</string>
<string name="rb_button2">ボタン2</string>
<resources>
<string name="app_name">hyomolutionRadioButtonSample</string>
<string name="rb_button1">ボタン1</string>
<string name="rb_button2">ボタン2</string>
</resources>
<resources>
<string name="app_name">hyomolutionRadioButtonSample</string>
<string name="rb_button1">ボタン1</string>
<string name="rb_button2">ボタン2</string>
</resources>
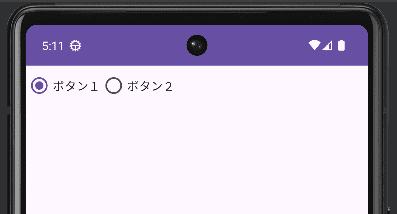
実行してみて、以下のようにボタンが選択できたらOKです。(RadioGroupの中に記述したRadioButtonのうち、1つのボタンが選択できます。RadioGroupを複数書いて動きを見てみると、わかりやすいかと思います。)
初期値で選択するボタンを設定する
ラジオボタンは「android:checked=”true”」を指定することで、アプリ起動時に指定のボタンを選択された状態にすることができます。
例えば、「ボタン2」を選択した状態で起動するように設定します。
●activity_main.xml
<?xml version="1.0" encoding="utf-8"?>
<LinearLayout xmlns:android="http://schemas.android.com/apk/res/android"
android:layout_width="match_parent"
android:layout_height="match_parent"
android:orientation="vertical" >
android:id="@+id/rbGroup"
android:layout_width="wrap_content"
android:layout_height="wrap_content"
android:orientation="horizontal" >
android:id="@+id/rbButton1"
android:layout_width="wrap_content"
android:layout_height="wrap_content"
android:text="@string/rb_button1"/>
android:id="@+id/rbButton2"
android:layout_width="wrap_content"
android:layout_height="wrap_content"
android:text="@string/rb_button2"/>
android:id="@+id/rbButton3"
android:layout_width="wrap_content"
android:layout_height="wrap_content"
android:text="@string/rb_button3"/>
<?xml version="1.0" encoding="utf-8"?>
<LinearLayout xmlns:android="http://schemas.android.com/apk/res/android"
android:layout_width="match_parent"
android:layout_height="match_parent"
android:orientation="vertical" >
<RadioGroup
android:id="@+id/rbGroup"
android:layout_width="wrap_content"
android:layout_height="wrap_content"
android:orientation="horizontal" >
<RadioButton
android:id="@+id/rbButton1"
android:layout_width="wrap_content"
android:layout_height="wrap_content"
android:text="@string/rb_button1"/>
<RadioButton
android:id="@+id/rbButton2"
android:layout_width="wrap_content"
android:layout_height="wrap_content"
android:checked="true"
android:text="@string/rb_button2"/>
<RadioButton
android:id="@+id/rbButton3"
android:layout_width="wrap_content"
android:layout_height="wrap_content"
android:text="@string/rb_button3"/>
</RadioGroup>
</LinearLayout>
●strings.xml
<string name="app_name">hyomolutionRadioButtonSample</string>
<string name="rb_button1">ボタン1</string>
<string name="rb_button2">ボタン2</string>
<string name="rb_button3">ボタン3</string>
<resources>
<string name="app_name">hyomolutionRadioButtonSample</string>
<string name="rb_button1">ボタン1</string>
<string name="rb_button2">ボタン2</string>
<string name="rb_button3">ボタン3</string>
</resources>
<resources>
<string name="app_name">hyomolutionRadioButtonSample</string>
<string name="rb_button1">ボタン1</string>
<string name="rb_button2">ボタン2</string>
<string name="rb_button3">ボタン3</string>
</resources>
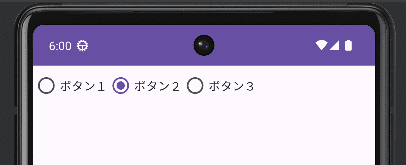
実行してみて、以下のように「ボタン2」がすでに選択できていたらOKです。実行後はもちろん違うボタンも選択できます。
ラジオボタン(RadioButton)を選択したときの動き
ラジオボタンを選択したときに、どのボタンが選択されたのかが分かるような動きをつけていきます。※アプリの処理はJavaファイル(MainActivity.java)に記述します。
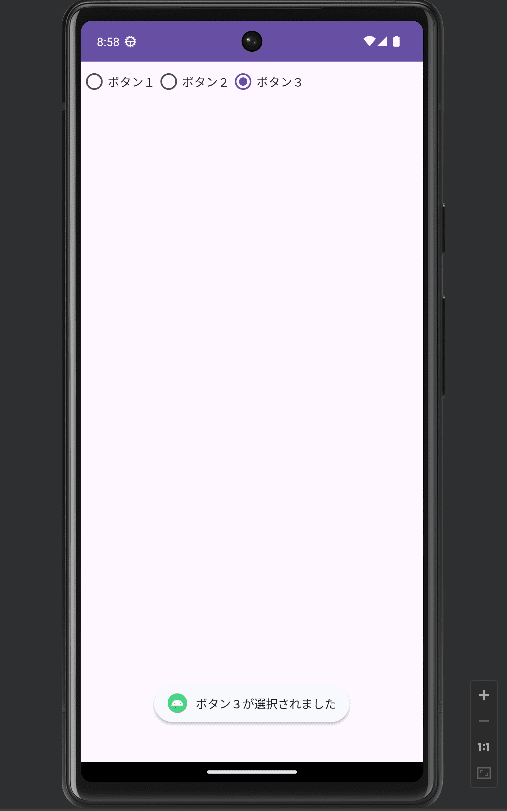
ここでは、ラジオボタンが選択されたら「ボタン○が選択されました」と画面に表示することとします。
ラジオボタンの選択が(初期値から)変更された時のイベントを受け取るためにRadioGroupの「setOnCheckedChangeListener」を使用しましょう。
下のコードの21行目が、ボタンを選択したときに呼び出される処理になります。
●MainActivity.java
package com.example.hyomolutionradiobuttonsample;
import androidx.appcompat.app.AppCompatActivity;
import android.os.Bundle;
import android.widget.RadioButton;
import android.widget.RadioGroup;
import android.widget.Toast;
public class MainActivity extends AppCompatActivity {
protected void onCreate(Bundle savedInstanceState) {
super.onCreate(savedInstanceState);
setContentView(R.layout.activity_main);
RadioGroup rbButton = findViewById(R.id.rbGroup);
rbButton.setOnCheckedChangeListener(new RadioGroup.OnCheckedChangeListener() {
public void onCheckedChanged(RadioGroup group, int checkedId) {
RadioButton rbCheckedButton = findViewById(checkedId);
//メッセージを画面に表示(ボタン○が選択されました)
Toast.makeText(MainActivity.this, rbCheckedButton.getText() + "が選択されました", Toast.LENGTH_LONG).show();
package com.example.hyomolutionradiobuttonsample;
import androidx.appcompat.app.AppCompatActivity;
import android.os.Bundle;
import android.widget.RadioButton;
import android.widget.RadioGroup;
import android.widget.Toast;
public class MainActivity extends AppCompatActivity {
@Override
protected void onCreate(Bundle savedInstanceState) {
super.onCreate(savedInstanceState);
setContentView(R.layout.activity_main);
RadioGroup rbButton = findViewById(R.id.rbGroup);
rbButton.setOnCheckedChangeListener(new RadioGroup.OnCheckedChangeListener() {
@Override
public void onCheckedChanged(RadioGroup group, int checkedId) {
//選択されたラジオボタンを取得
RadioButton rbCheckedButton = findViewById(checkedId);
//メッセージを画面に表示(ボタン○が選択されました)
Toast.makeText(MainActivity.this, rbCheckedButton.getText() + "が選択されました", Toast.LENGTH_LONG).show();
}
});
}
}
実行してみて、以下のようにアプリ画面に「ボタン○が選択されました」が表示されていたらOKです。
まとめ
Android Studio でラジオボタンを作成する方法について解説しました。
まずは自分の思い通りの並び・テキストでラジオボタンが作成できたらOKです。
慣れてきたら、ラジオボタンを押したときの処理も書けるようになっていきましょう。
(この辺はJavaを知っていれば、理解しやすいかなと思います)
コメント