・EditTextの使い方が知りたい
・Android Studioで入力可能なテキスト欄を作成したい
という方に向けた記事になります。
EditTextを使用すると、ユーザが入力可能なテキスト欄を作成できます。テキスト欄に入力された文字列をアプリ内で受け取り何らかの処理を返す、ということを容易にします。
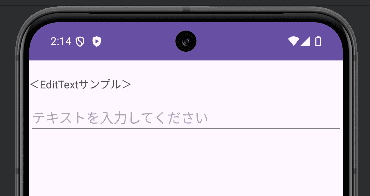
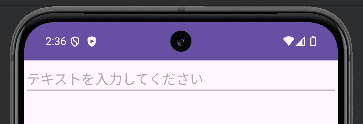
本記事では、EditTextで入力可能なテキスト欄を作成する方法について解説します。実際に入力可能な以下のようなテキスト欄を作成しながらEditTextの使い方を見ていきましょう!
Android EditTextとは?
Android EditTextはユーザが入力したテキストを受け取ることができるビューです。EditTextを使用することで、アプリ内でユーザーが入力した情報を簡単に取得できます。
使用例として、ユーザID・パスワード・メールアドレス等の入力があげられます。
Android EditTextの基本的な使い方
Android EditTextの基本的な使い方は以下の通りです。
手順
- テキスト入力欄をアプリ画面に追加する
- 入力されたテキストを受け取る
一つずつ見ていきます。
テキスト入力欄をアプリ画面に追加する
まず、テキスト入力欄をアプリ画面に追加します。レイアウトファイルに以下のコードを追加しましょう。
●activity_main.xml
<?xml version="1.0" encoding="utf-8"?>
<LinearLayout xmlns:android="http://schemas.android.com/apk/res/android"
android:layout_width="match_parent"
android:layout_height="match_parent"
android:orientation="vertical">
android:id="@+id/etInput"
android:layout_width="match_parent"
android:layout_height="wrap_content"
android:hint="@string/et_text"/>
<?xml version="1.0" encoding="utf-8"?>
<LinearLayout xmlns:android="http://schemas.android.com/apk/res/android"
android:id="@+id/main"
android:layout_width="match_parent"
android:layout_height="match_parent"
android:orientation="vertical">
<EditText
android:id="@+id/etInput"
android:layout_width="match_parent"
android:layout_height="wrap_content"
android:inputType="text"
android:hint="@string/et_text"/>
</LinearLayout>
●strings.xml
<string name="app_name">EditTextSample</string>
<string name="et_text">テキストを入力してください</string>
<resources>
<string name="app_name">EditTextSample</string>
<string name="et_text">テキストを入力してください</string>
</resources>
<resources>
<string name="app_name">EditTextSample</string>
<string name="et_text">テキストを入力してください</string>
</resources>
「android:inputType」に、どのような種類の文字列を入力可能にするかを、「android:hint」に、どのような文字列を入力できるかのヒント(入力例)を指定できます。
ここまで記述できたら、アプリを実行してみましょう。以下のような入力欄が表示され、テキストが入力できることを確認します。(この時点ではテキストを入力しても何も起こりません。)
入力されたテキストを受け取る
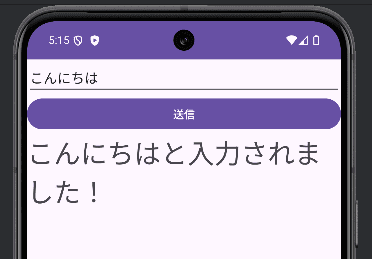
次に、入力欄より入力されたテキストを受け取る処理を追加します。具体的には、送信ボタンを押したときに入力されたテキストを受け取り、アプリ画面に「○○と入力されました!」と表示されるようにしましょう。
先ほど作成したレイアウトファイルのEditTextの下に、送信ボタンと受け取ったテキストを表示するためのTextViewを追加します。
●activity_main.xml
android:id="@+id/btSubmit"
android:layout_width="match_parent"
android:layout_height="wrap_content"
android:text="@string/bt_submit"/>
android:id="@+id/tvOutput"
android:layout_width="match_parent"
android:layout_height="wrap_content"
android:textSize="35sp" />
<Button
android:id="@+id/btSubmit"
android:layout_width="match_parent"
android:layout_height="wrap_content"
android:text="@string/bt_submit"/>
<TextView
android:id="@+id/tvOutput"
android:layout_width="match_parent"
android:layout_height="wrap_content"
android:text=""
android:textSize="35sp" />
<Button
android:id="@+id/btSubmit"
android:layout_width="match_parent"
android:layout_height="wrap_content"
android:text="@string/bt_submit"/>
<TextView
android:id="@+id/tvOutput"
android:layout_width="match_parent"
android:layout_height="wrap_content"
android:text=""
android:textSize="35sp" />
●strings.xml
<string name="bt_submit">送信</string>
<resources>
<string name="bt_submit">送信</string>
</resources>
<resources>
<string name="bt_submit">送信</string>
</resources>
送信ボタンがアプリ画面に追加できたことを確認して、Javaファイルにボタンが押された時の処理を追加します。
●MainActivity.java
package com.hyomolution.edittextsample;
import android.os.Bundle;
import android.view.View;
import android.widget.Button;
import android.widget.EditText;
import android.widget.TextView;
import androidx.appcompat.app.AppCompatActivity;
public class MainActivity extends AppCompatActivity {
protected void onCreate(Bundle savedInstanceState) {
super.onCreate(savedInstanceState);
setContentView(R.layout.activity_main);
EditText etInput = findViewById(R.id.etInput);
Button btSubmit = findViewById(R.id.btSubmit);
TextView tvOutput = findViewById(R.id.tvOutput);
btSubmit.setOnClickListener(new View.OnClickListener() {
public void onClick(View view) {
String input = etInput.getText().toString();
//出力用に作成したTextViewに出力文字列をセット
tvOutput.setText(input + "と入力されました!");
package com.hyomolution.edittextsample;
import android.os.Bundle;
import android.view.View;
import android.widget.Button;
import android.widget.EditText;
import android.widget.TextView;
import androidx.appcompat.app.AppCompatActivity;
public class MainActivity extends AppCompatActivity {
@Override
protected void onCreate(Bundle savedInstanceState) {
super.onCreate(savedInstanceState);
setContentView(R.layout.activity_main);
//IDに対応するビューオブジェクトを取得
EditText etInput = findViewById(R.id.etInput);
Button btSubmit = findViewById(R.id.btSubmit);
TextView tvOutput = findViewById(R.id.tvOutput);
//送信ボタンを押した時の処理
btSubmit.setOnClickListener(new View.OnClickListener() {
@Override
public void onClick(View view) {
//入力欄のオブジェクトよりテキストを取得
String input = etInput.getText().toString();
//出力用に作成したTextViewに出力文字列をセット
tvOutput.setText(input + "と入力されました!");
}
});
}
}
ここまで記述できたら、アプリを実行してみましょう。入力欄に入力した文字列が出力されること確認します。
まとめ
Android EditTextの使い方について解説しました。
EditTextではユーザが入力可能なテキスト欄を作成できました。どのような種類の文字列を入力可能にするかを指定できる「android:inputType」属性では、以下のような値も指定できます。EditTextの使用に慣れてきたら、様々なタイプのテキスト入力欄を作成してみてください。
値 | 入力できる文字列 |
---|
text | テキスト文字列 |
textEmailAddress | メールアドレス |
textMultiLine | 複数行のテキスト文字列 |
textPassword | パスワード |
number | 整数値 |
phone | 電話番号 |
コメント